The OKI and UniNet IColor laser transfer printers are versatile, affordable solutions for digital decoration of garments and rigid substrates. Digital decorators with varying levels of experience are discovering the unique benefits of laser transfer and self-weeding papers. As with any digital transfer process, there are a few tips and tricks that can make the difference between a long learning curve and a quick start to success. When there are orders to fill and things aren't going right, a simple thing like a T-shirt transfer can seem like scaling Mount Everest. To help you move those mountains, we offer these laser transfer troubleshooting tips.
IColor Light 1 Step Transfer Paper Self-Weeding Paper Tips
IColor Light 1 Step Transfer Paper is our one step, self-weeding paper for white, gray, and pastel shirts. It's great for high resolution photo quality images on cotton, polyester, acrylic, and blended garments. It comes in packs of 100 letter size and 11" x 17" sheets. The process is pretty simple. You design your graphic, print it on Light 1-Step paper using the correct settings, then heat press it to a garment. Removing the paper from the shirt leaves only the toner as the image is 'weeded' during removal of the paper. Then stretch the shirt and repress for 25 seconds. Although it's not a complicated process, there are a few things that can go awry.

Tacky or pinkish residue: Sometimes your transfers will have a tacky feeling to them. Cotton shirts may feel sticky, polyester shirts may feel tacky and have a slightly pinkish hue. This is caused by excessive heat. Reduce the temperature on your heat press until this goes away. The recommended temperature is 345°F. Check your heat press to make sure the displayed temperature setting is the actual platen temperature. Unless you've already calibrated it, it may be off by as much as 20 degrees. Here's how to check it and calibrate it.
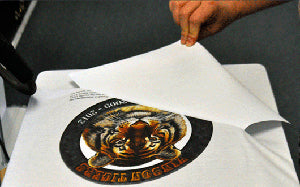
Paper sticking to print: If you have pieces of the transfer paper sticking to the garment after peeling, you're leaving it on too long. For best results, begin peeling the transfer paper 10 - 15 seconds after the heat press cycle ends. (See Figure 2.)
Cracking or fading transfers: Some customers have complained that their transfers crack after being applied to the garment, or that they wash off. Both of these problems are caused by skipping the following repress step: After peeling the FHC paper, always stretch the garment, then cover it with silicone paper or a Teflon sheet and repress for 25 seconds. This bonds the toner with the fabric, and makes the applied transfer flexible and wash-fast. For detailed application instructions and more troubleshooting tips, please click here to view or download the PDF.
Two-Step Laser Dark Papers
Decorating dark garments requires self-weeding paper that works in two stages. The two-step solutions work with the OKI and IColor laser transfer printers. The 2-step paper that we carry is LXF Dark, IColor 2-Step Standard (‘A’ Foil and ‘B’ Adhesive paper), 2-Step Standard 550 (‘A’ Foil and ‘B’ Adhesive paper), and 2-Step Premium paper. These products include two sheets of paper; an imaging sheet called the ‘A’ Foil and a transfer sheet called the ‘B’ paper. Design your vector graphic (without any white or pastel hues) and print it on the imaging sheet. Then press it to face to face with a transfer sheet. When the sheets are separated, the transfer sheet gives and takes. It takes away the un-printed polymer coating from the imaging sheet* and adds an adhesive coating to the toner that allows it to stick to the garment on the second step.
Heat Loss: you're most likely letting the paper cool too quickly. The best way to avoid this is to close the heat press for a couple of minutes before you press the imaging sheet and transfer sheets together. This pre-press cycle warms the bottom table so that it's not pulling heat from the paper during the separation step. The paper stays warm as you separate the sheets resulting in a more consistent transfer. This step also works with LXF Dark transfer papers. Keeping the press table warm is THE most important step to obtaining a clean transfer and even coating on this first step with all two-step laser transfer papers.
Pressure: If you're doing this, but still getting uneven transfers - or if all the toner is transferring from the imaging sheet to the transfer sheet- you're using too much pressure. This step requires only medium to light pressure. Reduce it moderately until you get a clean separation with no toner on the transfer sheet, and a solid white base of polymer applied to the bottom of the imaging sheet.
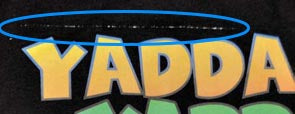
2) White lines on final transfer: If, after pressing the transfer to the garment (step two), you have traces of white on the shirt where the edges of the paper were, (Figure 4), there are two possible causes.
Transfer Sheet Residue: Pressing and peeling the imaging and transfer sheets usually leaves a line of residue from the imaging sheet on the transfer sheet. This is the case with both IColor and LXF products. Always trim the edges of the imaging sheet before pressing it to the garment. This will remove the inevitable line of polymer left from the edge of the transfer sheet on the imaging sheet.
Pressure: If you've trimmed this and you still end up with a white line on the shirt, you're using too much pressure. Although the second stage requires more pressure than the first, overdoing it can crush the edges of the transfer paper causing it to embed itself in the fabric.


