We have good news for garment decorators using laser transfer printers. Some GO UNO and OKI 711WT and 920WT owners have been asking for an easier-to-use transfer paper for decorating dark garments. We are pleased to announce that we've recently added just such a product. Forever Laser Dark (No-Cut) Low Temp papers are now in the SignWarehouse warehouse. Using Laser Dark (No-Cut) Low Temp papers will maximize the fun and profit of your laser transfers for dark shirts whether you're using a CMYK model or a white toner printer. What's so special about Forever Laser Dark NoCut Low temp - other than the really long name? Click on the Read More button to find out.
Forever Papers: Overview.
Although Forever is a new name to most of our customers, it's not a new company. They've been pioneering digital transfer technology in Europe for over 25 years. It's a German company and you definitely get that quality-obsessed 'German engineering' vibe when you talk to them. Their decades of research and development are an important part of what makes Laser Dark (No-Cut) Low Temp such an outstanding product. But of course it's not their only product. Laser Dark No-Cut is just one of a complete line of thermal transfer films and papers they're bringing to the American market. We've also added Forever Multi-Trans, a one-step paper for decorating hard surfaces. If you already know you want this paper and why you want this paper, you can stop reading right now and click here to order some online. Forever Laser Dark comes in two sizes: 8.5" x 11" and 11" x 17". The A-Foil and B Paper Low Temp are sold separately, so be sure to order one of each. A pack of letter-size A Foil sheets costs only $75.00, so despite its unique benefits, it costs about the same as other dark garment laser transfer papers. If you don't know yet why you want this paper, keep reading.Laser Dark (No-Cut) Low Temp Features
Like all other no weed or self-weeding laser transfer papers for darks, Laser Dark No-Cut Low Temp is a bifurcated product. It consists of two sheets of material and requires two heat press cycles.
- Transparent Film: Unlike all other laser transfer solutions, the imaging sheet, known as the A Foil, is transparent. The transparent A foil offers the unique benefit of precise placement of the transfer on the garment. No more guessing about alignment.
- Low Temp: As the really long name implies, Forever Laser Dark…No-Cut…Low Temp works at lower application temperatures than other papers. The B Paper, which applies the adhesive layer to the toner, activates at temperatures as low as 212°F (100°C). And the A Foil can be applied to apparel at temperatures as low as 275°F. This makes it a much more versatile solution for decorating heat-sensitive fabrics like Nylon and polyester. Decorating polyester with other papers that require more heat can leave a slightly gummy residue on the garment.
- Consistent Transfers: As anyone who owns a laser transfer printer knows, the most challenging part of the dark garment decoration is getting consistent results in the first step. The transfer sheet has to coat the toner consistently, job after job. Few other papers do that as well as Forever Laser Dark No-Cut LowTemp. There are a few tips and tricks involved, but if you use it as directed, you'll see more consistent transfers which means fewer wasted prints, better productivity, and better profitability.
- Versatility & Durability: Unlike other products, Laser Dark No-Cut works with both CMYK and white toner printers, so you can use it for GO UNO, OKI C831-TS, 711WT, or OKI PRO 920WT. The FOREVER Laser Dark (No-Cut) Low Temp A Foil & B Paper Low Temp instruction sheet (whew!) has complete and specific details for each application so you know how to design the graphics, and apply the papers for your color configuration. And the B Paper can be used with other products to create flock and foil effects, which is why they're sold separately. The adhesive layer on the B Paper adds washfastness to the applied transfer giving it excellent durability. Applied properly, your transfers should last for 30 to 40 wash cycles.
Laser Dark Process
For complete, detailed instructions, see the link above. Here's a brief summary of the Laser Dark process. There are essential tips and non-essential technical notes below. Be sure to read the tips before you try your first transfer.
1) Set the Media Type to Films and load the A-Foil transparent sheets in your printer's multi-purpose tray, matte side up. Like all direct transfer processes, the initial design must me mirrored in order for the final appliqué to be 'right reading'. When the transparency comes off the printer, you should be able to flip it over glossy-side up, and read the image correctly.
2) Press the A Foil sheet and B Paper sheet together with medium pressure for 90 - 120 seconds at 320 - 340°F
3) Peel hot. Separate the sheets immediately in one smooth motion.
4) Trim the edges of the A Foil sheet with scissors to remove any B Paper residue from the A Foil.
5) Increase pressure on your heat press to firm (about 72 psi) and position the A foil on the garment. It should be 'right reading' with the color image visible through the transparency. Press for 30 seconds. Peel cold. The temperature on this stage depends on the fabric or material being decorated.
- Cotton-Press at 285-340°F for 30 seconds at 72psi
- Polyester: Press at 265 - 285°F for 30 seconds at 72psi
- Polypropylene: Press at 220°F for 30 seconds at 72psi
- Blended Fabrics: Press at 285 -300°F for 30 seconds at 72psi
- Paper/Carton: Press at 2105°F for 15 seconds at 14-28psi (light pressure)
- Book Covers: Press at 230 - 250°F for 15 seconds at 14-28psi (light pressure)
6) Cover the transfer with Forever Glossy Finishing Paper or Matte Economy Finishing Paper and press with heavy pressure for 15 to 30 seconds (30 seconds on cotton, 15 on polyester). This will cure the toner on the fabric, make it more durable, and give the transfer a gloss or matte finish.
Tips & Technical Insights
There are a few important tips to add here. Most of these tips are deigned to prevent premature cooling of the A Foil and B paper after the first heat press cycle. In addition, we have some technical insights into the process that I think some might find helpful. If you don't feel you need to understand how and why this product works, ignore the italicized "Technical Insights" section, at the bottom. If you want to know what's going on and gain a better understanding of what you and your paper are doing, check out the footnotes. Now, on to the tips.
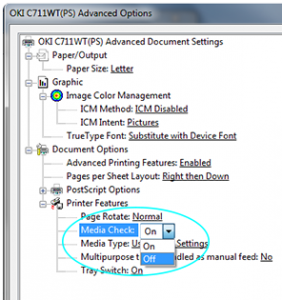
A Foil - Media Check: Some printers have trouble feeding the transparent A-Foil sheets. The default setting in the OKI printers is for the printer to check for paper before pulling it off the multi-purpose tray. This doesn't work with a transparent film because the media sensor can't see the leading edge. To solve this problem, change the Media Check setting to Off (Fig 1).
A Foil- Media Feed: The A-Foil material has more density than regular paper - this is to help it hold more heat during the peeling process. As such it needs to feed into the printer as straight as possible. To help with this place a stack of 20 - 30 sheets of regular paper into the tray and then place the A-Foil sheet on top. This will help with any feed issues you might encounter.
Preheat the Table: Based on Forever's research and testing, the most important part of the first stage is keeping the heat press table warm. They recommend pre-heating the table by closing the press for 2 minutes just before pressing the A and B sheets together. This prevents the paper from cooling too quickly while you're separating the sheets.
Cover the Sheets: Before that first stage, cover the A foil and B paper with a sheet of standard copy paper. This is especially important if you use and auto-open heat press. The sheet of paper keeps the heat press from sucking the A and B sheets off the table when the platen is lifted. If you're using a manual press, don't lift the platen so abruptly that you create a vacuum. If the platen pulls the papers off the table, they'll start to cool and the separation may be more difficult.
Keep 'em Flat: Finally, remember to keep the A Foil and B Paper sheets flat on the table as you peel them (as noted on page three of the instruction sheet). If you've been looking for a more consistent transfer paper for your GO UNO or OKI WT printer, here's your upgrade. Try the Forever Laser Dark (No-Cut) Low Temp solution. You'll find your dark garment decoration more pleasant, more productive, and more profitable.
Technical Insights: You can think of this as a three or four layer process when all is said and done. Looking at the final garment, the first layer comes from the transparent foil. The second layer comes from the laser toner. The third layer comes from the white backing sheet. Under these is the actual garment (n the case of Finishing with Hot stamping Foil or Flock then this is the first layer). The first layer is designed to protect and overlay the toner layer. It is present on the A-Foil. In the case of the A-Foil finishing this layer is designed to bond to the hot stamping foil or flock. The second layer is the composition of design which is done in a fashion where the normal colors are represented in CMY color space (Not CMYK). Then white toner is added to serve two purposes, to add directly white elements, and to fill in around the solid tiny dots that make up tonal values such that for example a 50% Magenta tint will consist of 50% magenta toner and 50% (or more) white toner. The third layer is the opaque white backing from the B-Paper.
It serves two main purposes. First the toner itself is not completely opaque. If you put a 100% Yellow patch of toner on a black shirt alone - you would not see a bright yellow as the black shirt would show through it. The white opaque backing causes the light that passes through the toner to reflect back and stops any shirt color from coming through (click here for a more detailed explanation of this principle). Secondly it provides an adhesion property that bonds the other two layers to the garment in a strong fashion. This thermal bond is released when hot and cures when cold. The "Self Weeding" property is achieved by the fact that the White Backing Layer - will NOT Stick - to the A-Protective Layer! It will only stick to the toner. In a normal state the white backing is solid and hard, when heated sufficiently it converts to a very sticky fluid which attaches first to the toner and then to the garment.


