Not everyone who wants to start printing and selling T-shirts needs to cover dark garments. Sometimes you just want to put a nice color graphic on a cotton tee. We hear you. That's why we've expanded our T-shirt printer media line to include a new inkjet heat transfer paper.
Logical Color RGP inkjet paper has an even softer hand than DarkJET. Now you can create full-color heat transfer decals that feel more like screen printed appliqués. To produce this level of softness, you have to put the ink directly on the fabric so this is an application for white and pastel garments. It's a very affordable and versatile film for desktop inkjet printers that can accommodate seasoned sign makers or hopeful hobbyists. You can use RGP in a print-and-cut workflow with your fancy ARMS-equipped vinyl cutter and a heat press. Or you can turn your print into a T-shirt transfer with a pair of scissors and a household iron.
Logical Color RGP Features
Logical Color RGP is a red-grid printable inkjet heat transfer paper. It's ideal for soft appliqués on cotton, polyester, cotton/poly blends, and similar fabrics. But it's not just for T-shirts. You can use this versatile film to decorate mouse pads, tote bags, and similar items including canvas.
Since it's a reverse-print paper on which the ink is transferred directly to the fabric, there's no transfer tape required. This makes it very simple and economical. Finally, RGP is a warm peel film, so you can remove the liner and move on to the next shirt as soon as the press cycle is done.
Logical Color RGP saves you time and money. You save time by not having to apply heat transfer tape and by not having to wait for the transfer to cool Logical Color RGP is designed for use with aqueous (water-based) dye and pigment inks, but pigment ink transfers will be more durable and washfast. It comes in boxes of 25 and 50 sheets in A4 and A3 sizes. A4 sheets will fit most desktop inkjet printers that default to letter size. A3 sheets will fit 'wide format' printers made for Tabloid 11" x 17" paper. A pack of 25 A4 sheets can be yours for only $29.95, or $1.20/sheet. A box of 50 sheets is only $49.95 or just a smidge under a dollar per sheet. You can browse all the options here.
Print, Cut, and Application Instructions.
The Logical Color RGP process is quite...logical. It's essentially the same as that for our popular Logical Color DarkJET inkjet heat transfer paper, with a couple of exceptions. With RGP, you print a mirrored image (as in dye sublimation and laser transfer) and apply without heat transfer tape. That's the short, short version. Click here to download a simple instruction sheet you can keep next to your heat press.
Here's the print-by-numbers version, including instructions on setting up the artwork.
1) Design your image in Vinyl Express LXI or other vector design software or import an image file to LXI. If you import a raster file such as a .jpeg or .png, you may want to delete the background so that you're not heat pressing a big white box on to the shirt. If your graphic is going on a white shirt, you may decide to skip this step
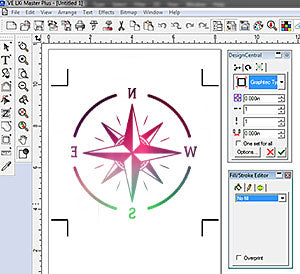
2) Mirror or reverse image using the Flip Y-Axis tool in Design Central.

3) From the Effects Menu, select Contour Cut. Add a contour cut path around the image. Then from the same menu, select Contour Cut Marks to add the printed registration marks your vinyl cutter will read in order to cut around the printed area. Be sure to choose the registration marks that match your vinyl cutter's firmware. Choose Graphtec Type 1 Automatic for Vinyl Express Qe cutters, SAI Automatic marks for Rogue or MUSE cutters, and Roland crop marks for a GX24 or GS24). These will be previewed in the drop-down menu (Fig1). Be sure to press Enter or click the green checkmark to apply the Contour Cut Marks.
5) Print to your desktop inkjet printer, using A3 or A4 sheet size. Be sure to keep the scale of the image at 100%. Do not enlarge or resize it to fit the media. Select Bottom Center to position the print at the front edge of the RGP paper.
6) Remove the print from the printer and place it on your vinyl cutter. RGP is very thin and easy to cut with a standard 45° plotter blade. If you're using a Vinyl Express Qe, Q Series plotter, or a MUSE or Graphtec vinyl cutter, set the blade force at 9. If you're using a Vinyl Express Rogue, Roland or GCC plotter, start with about 80 grams of force. Do a test cut to make sure you are only cutting the top layer, not cutting all the way through the paper and liner.
7) Use the LXi File/Cut Contour function to launch production manager. Check the orientation of the graphic in your preview pane to make sure it matches the way you have the image loaded in the plotter. If it's upside down, remove the print, turn it around.
8) Hit send. LXI will prompt you to position the blade over the lower right registration mark and set that as the origin point. Do so now if you haven't already. Then click OK . LXi will automate the process and send commands to the plotter to scan the registration marks and cut out the image.
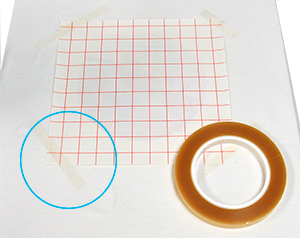
9) Weed the excess material and place your decal print-side down on the garment. There is no adhesive holding the paper to the shirt so you may need to use some heat transfer tape to fasten the corners of the paper to the fabric.
10) Press at 375°F for 20 seconds with medium pressure. Peel warm & stretch. No heat press? No problem! Logical Color RGP can be applied with a household iron. Place the transfer and garment on a hard surface (not an ironing board) and set the iron on the highest setting with no steam. Start with firm pressure and work your way slowly around the edges of the transfer spending about a minute in each area. The total time for application is about five to six minutes. Peel warm and stretch. Stretching the shirt while the ink is warm bonds it more effectively with the fabric, and prevents cracking later after the garment is washed.
Care Instructions
Speaking of washing, all printed apparel should be laundered with care. With aqueous inkjet transfers, it's best to wait 24 hours to allow the ink to cure fully before the first wash. The best practice is to wash them inside-out in cold water. Do not use bleach, fabric softeners, or detergents with bleach additives. Tumble dry on medium or normal setting. Overheating during the drying cycle can cause the print to crack. So like, don't do that.
So if you've been itching to try your hand at T-shirt printing, but wanted something softer, Logical Color RGP is for you. If you've been doing well with DarkJET,but would like a softer option for whites, RGP is for you. And if you just don't like dealing with heat transfer tape or cold peel films, RGP is for you too. Whether you're using a pair of scissors and an iron or an advanced vinyl cutter and a heat press, you'll appreciate the soft hand, vivid color, and low price of Logical Color RBP.


