
In the world of digital graphics, much is said about the primary means of producing your image: generally by printing, cutting, or both. But little is said about finishing; especially lamination and trimming. So it’s time we said something about it. This post will cover all the basic aspects of lamination of digital prints. We’ll examine why, when and how to laminate, what kind of laminators work best, and when to use film or liquid laminates. Hopefully, you’ll glean some tips that will eliminate costly problems and improve the quality of your products.
Lamination of Digital Prints: Why, When, How
Why: Whether you’re using an aqueous or solvent-based inkjet printer, there are several good reasons to laminate your digital graphics. Overlaminate film and liquid laminates protect your graphics from abrasion, chemicals, and UV exposure. With solvent, ecosolvent, and thermal resin prints, UV exposure isn’t the main problem because the resins are engineered to last for three to five years outdoors without lamination. However, abrasion and detergents can rub or wash the pigment off of the prints. They’re like a gang of hoodlums that roam the country looking for unprotected graphics. They sneak in while you’re not looking and rub ‘em out. You need protection. Any printed graphic installed in an environment in which the final product will be washed, walked on, or exposed to dirt and debris should be laminated. With aqueous inkjet prints, an overlaminate can also protect from UV exposure and extend the outdoor life of the ink. Depending on the quality of the overlaminate, an aqueous inkjet print can last up to eight times longer than it would without protection. ORAGUARD 290 for instance, can stretch the life of a pigment inkjet image from six months to four years.
When: Despite what Ben Franklin said, there are some things you should put off until tomorrow. Lamination is one of them. Solvent based inks work by using solvents to penetrate the print media and carry the resins below the surface where they can hide from the sun. Once they carry the resins into the media, they evaporate leaving the color behind. That evaporation process is called outgassing. It takes a while. Always allow sufficient time for your prints to outgas or cure prior to laminating. Media manufacturers recommend a full 24 hours for outgasing before laminating solvent or eco-solvent prints. Some of our most successful customers in the wrap business have found that an hour or two is sufficient. It depends in part on the amount of ink applied to the media, so as the EPA says, your mileage may vary. Determine the proper time for your prints to based on ink load, saturation and the operating environment. Getting this right is especially important when you need an optically clear overlaminate such as those used on perforated window films, which tend to show haze from trapped solvents more easily. This step isn’t necessary with thermal resin, or aqueous inks. Latex ink is water-based and promises instant lamination, but Latex printer user manuals still recommend allowing proper time for curing before laminating.
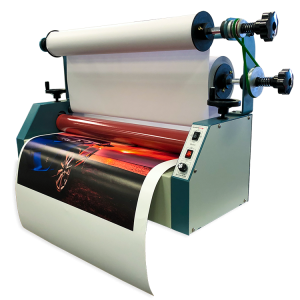
How: Out-gassing doesn’t work if the gasses can’t um...get out. Don’t print something, then roll it up on the core for a day. If it’s wound so tightly that air can’t reach all of the printed surface, the time spent outgassing is wasted. If you must roll it, make sure it’s loose enough for air to penetrate the layers and fully dry the ink. Once it’s done curing, how do you laminate it? That depends on how large it is and how efficient you need to be. The most efficient way to laminate large format prints is with a motorized laminator like a EnduraLAM3 cold laminator. Well designed laminators can quickly and smoothly apply a sheet of overlaminate film to large graphics like vehicle wrap panels. Tension, speed, and pressure can be controlled mechanically so the print looks great from edge to edge and the applied film is virtually invisible. For small jobs like yard signs or posters, you may also use a handy tool like the Big Squeegee or a desktop model like the Daige Solo 25.
Hot or Cold?
There are two kinds of laminators on the market: hot and cold. Cold laminators like the EnduraLAM models referenced above, use pressure alone to apply adhesive-backed clear film to digital prints. Hot laminators add heat to the formula and can be used with adhesive backed overlaminate films and a wider variety of films. Which one is right for you? It depends on the kind of ink used in your printer. Eco-solvent printers use heat to prepare media to receive ink and heaters and dryers are used to cure the ink and allow it to penetrate the surface of the print media. Once the ink is cured, re-introducing heat during the finishing process can reactivate the ink and cause it to bond with the adhesive of the overlaminate film causing unwanted artifacts in the print. So, for eco-solvent inks use cold laminators. Or if you have a laminator with heat assist as an option run it cold for best results.Laminates: Film or Liquid?
There are two kinds of overlaminate used in digital graphics: adhesive backed film and liquids or clear coat. Overlaminate films are more commonly used in commercial sign making because they’re easy to apply quickly. Film is great for protecting prints with smooth surfaces: digital vinyl, paper, backlit film, semi rigid exhibition graphics, and super smooth banner media. Liquid laminates are ideal for protecting prints on textured surfaces where a complete seal between an overlaminate film and the print is impossible to attain. Scrim banner and canvas are the two most commonly used print media that would require liquid laminates instead of adhesive backed film.
Film: Cast or Calendered. There are two basic categories of overlaminate film distinguished by the method of manufacture. Just as with plotter films and digitally printed vinyl, the two options are cast and calendered. The distinction between the two is the same as with the films they cover. Cast overlaminates are more conformable by nature and will adhere to compound curves. Calendared overlaminate films are designed for application on flat surfaces and simple curves.
Film: Matched components. Because of the differences in conformability and rates of shrinkage, it’s always a good idea to match overlaminate films to comparable vinyls. Use cast overlaminates on cast print vinyls and calendared overlaminates on calendered vinyls whenever possible. If you must mix and match, you can use cast overlaminates on calendered print vinyl, but not vice versa. Covering a cast film with calendared overlaminate risks failure as the overlaminate shrinks on the cast vinyl. Likewise, if you have a vinyl with special properties, it’s highly recommended that you use the overlaminate film that’s engineered to match and complement it. For instance, PrismJET 230 Ultra, an ultra conformable calendered film, performs best with the matching 231 overlaminate. To get the full benefit of ultra-conformable wrap vinyl, always use the manufacturer's matching overlaminate. Besides optimizing performance, using the matched film may qualify you for warranty protection from the manufacturer in case of failure.

Liquid: Solvent or Aqueous. Just as there are two options in film, there are two choices for liquid laminates. But this choice is a lot simpler. There are solvent based and water based clearcoats. Use the one opposite of the composition of your ink. For instance, if you’re coating a solvent based print, use a water-based clearcoat such as ClearShield. For protecting water-based inkjet prints, use a solvent based laminate such as ClearJet. Using an aqueous clear coat on aqueous (dye or pigment) ink will backfire as the clear coat dilutes the ink and prevents it from drying. Likewise a solvent liquid laminate on solvent ink will prevent or reverse the curing process. Using the opposite composition allows the liquid clear coat to seal and encapsulate the ink.
How to apply: Liquid overlaminates can be applied by spraying, brushing them on, rolling or via a mechanical liquid laminator. Small aqueous inkjet prints can be coated with a simple aerosol spray can of ClearJET. The size of the prints and number of pieces in the production run will determine the best method.
Cautions about trimming and cutting: Just as there is a waiting period before laminating, there is an ideal time to cut or trim a freshly printed graphic. If you’re using solvent based inks, there is a possibility that cutting too early can cause edge curling. The ORACAL Practical Information Production Procedures Guide puts it this way. “Graphics that are trimmed or plotted directly through the ink within 24 hours after printing can begin to show signs of curling or shrinking around the perimeter once applied to the substrate. The freshly printed (uncured) solvents used in the inks to print the graphic are migrating around the cut line and irritating the perimeter of the adhesive layer. This in turn causes the edges of the material to curl up or shrink either on the release liner or once applied to the substrate.” So, as with lamination, it may be necessary to wait a day before trimming solvent graphics. If you’re selling full bleed printed decals, the same applies to the contour cutting process. If you can wait a day before cutting out the decals, you’ll have fewer worries about edge curl after they’ve been plotted.
All of this magnifies the importance of production control, planning, and managing customer expectations. It’s tempting to tell your customers you can deliver that job the same day; especially if the name of your business implies speedy turnaround. But selling something that’s not properly finished may produce a one time sale that doesn’t translate into repeat business. Finish the job properly, with the right laminate, applied at the right time, and watch your reputation and sales grow.


