Your heat press digital temperature read out may not be accurate. The readout may not match the actual temperature on the heat press platen. You could use an infrared temperature reader so you could cross-check results. Geo Knight and others makes excellent heat press machines that can be used for all kinds of thermal transfer applications, but sometimes the temperature readout require a little fine tuning, or calibration. Temperature and vibration extremes during shipping are the likely culprit. In any case, if yours hasn't been properly dialed in, it can make a big difference in the quality of your laser and sublimation transfers. How do you know if your press' temperature reading is 'off'? And more importantly, how do you fix it?
Indications of an Incorrect Temperature Display
There are 3 things to get right so that your heat press transfer adheres and lasts: Dwell time, pressure, and temperature. If you're carefully following the directions for your thermal transfer print applications regarding the first two, but still not getting the desired results, the heat press temperature display may be incorrect. I say “print applications” because this is not as critical an issue for CAD "heat transfer vinyl" processes. The films and adhesives in this segment work in a fairly broad temperature range. Chemica HotMark for instance, can be applied at 300 to 340°F. But for thermal transfer print technologies, the one that you can print on with a digital printer, the effective temperature range is pretty specific. Variations of ten degrees or more can affect the quality of the transfer. When sublimating polyester garments, a temperature variance of ten to twenty degrees can produce a transfer that's too faint.
For more about this, please see our earlier blog article about adjusting for soft polyester garments and coatings. The GO UNO laser transfer process also requires specific temperatures for best results. Decorating white shirts with EnduraTRANS FHC paper for instance, requires a press temperature of 345°F. If the press is too hot, you may get a tacky residue on the garment. Our early testing of the GO UNO and its associated laser transfer papers was complicated by erroneous readings from our DC16 heat press. The temperature display on the new machine was off by about 20 degrees. Once we got the heat press calibrated, everything worked more smoothly. So how do you know if your press temperature display is misleading you? Actually, it's easy if you have the right tool. You need to check the temperature readout against a very accurate thermometer. The recommended solution is a Surface Probe pryometer, available from Geo Knight.
Why not a standard IR thermometer?
According to the heat press experts at Geo Knight, hand held 'point & shoot' IR thermometers don't produce accurate readings on aluminum heating elements. Our tests have verified this. Readings taken with a hand held IR thermometer and the pyrometer varied widely. The contact probe on the pyrometer is more accurate for using and calibrating your heat press. So how does this gizmo work?How to Use the Type K IR Thermometer Kit
- Install the 9 volt battery that comes with the unit.
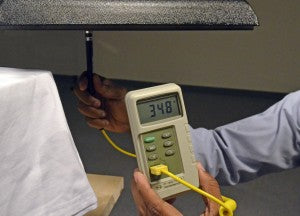
- Plug in the yellow Thermocouple probe into interface on front of pyrometer, making sure to align the positive and negative poles correctly.
- Turn it on and set to F or C (Fahrenheit or Celsius).
- Press 1.0. This will display the temperature in single degrees without a decimal. The pyrometer starts in the 0.1° mode, which shows tenths of a degree. When measuring temperatures over 100°, the display will read 0L, because there are not enough digits on the screen to display the decimal of 3-figure high temperature readings. Pressing 1.0° will display high temperatures properly.
- Remove the plastic cover from probe and place against the middle of the heating element. Make sure the spring tip is compressed evenly against the surface. Check the readout and compare to reading on digital display.
How to Calibrate your Digital Knight Heat Press
These instructions will work for all “Digital Knight” heat presses. These include the DC16, DK16, DK20, DK20-AR, DK20S, and DK20SP.- Turn the press off. Hold down TEMP & PRG keys tightly and turn it back on. When you see a screen displaying 203 Firmware, let go of the Temp and PRG keys. An OFS ("offset") screen will appear.
- Press the UP arrow key, and then the DOWN arrow key.
- The number shown is the “offset”. Use the UP arrow key to increase this number if the screen temperature needs to be increased compared to the pyrometer reading.
- If the screen temperature display needs to be lowered compared to the pyrometer reading, press the DOWN arrow key.
- Press the PRG key 8 times slowly, until the press returns to the regular operating mode.
- Press TEMP, reset the flashing temperature setting, and press TEMP again.
That should do it. Now the temperature reading on your press will be in harmony with the platen's actual surface temperature, with normal fluctuations of five degrees or so as the press heats and cools. If you need a pictorial guide with illustrations of the pyrometer and heat press display, please click here to download a PDF.


