Whether you’re working on a custom printed T-shirt or a vehicle wrap, the design phase is often the most time consuming part of a graphics job. Efficiency gains made in the design phase can pay big dividends in overall profitability. That’s why everyone should know how to use vector clip art. Proper use of clip art can greatly enhance your efficiency and therefore your bottom line. The term “clip art” is a throwback to the days of print publishing. Before “desktop publishing” commercial artists would clip a piece of artwork from a sheet –yes with scissors-- and paste into a layout.
These days cutting, pasting and clipping are a thing of the past, but the terminology persists. Clipping a virtual art file and ‘pasting’ it into a digital sign design is quick and easy, but can also be more challenging because of the various digital technologies used to create the files. This article will examine the most common challenges to new users of vector clip art; compounded paths. Often clip art designers will compound the various paths or elements in a design to make it easier to import and handle. But if you’re not aware of this, it can become quite frustrating when it’s time to edit or plot the image. Compounded clip art files often confound new sign makers. Here’s how to uncompound your files and un-confound yourself.
Compounded Vector Files
Vector clip art files come in several popular formats but the most common are .EPS and .AI files. Both AI and EPS files can have paths or elements in layers that don’t readily appear until you try to edit them. If you try to click on a part of a design and find that you can’t select it, it’s most likely because that path is grouped or compounded with another one, probably in a layered effect.
The most common problem caused by compounded clip art files is in the plotting stage. We hear from users who complain that, when they send a file to the plotter, all they get is an outline. That’s because you’re actually only sending the base layer.
Uncompounding or ungrouping the file’s paths will allow you to select, edit, and plot what you want. Keep in mind that the purpose of clip art is to enhance your work. The file doesn’t have to be used as is. It’s just a starting point. You can and should edit the image to suit your design using the node edit tools. Node editing allows you to redraw the original path. You can also use it to customize fonts to further distinguish your designs. Before you can unlock the original design and turn it into a something unique, you’ll need to know how to get to the original paths. Here’s how to do it.
How to Uncompound or Ungroup Clip Art Files
Here’s how to import and edit a vector clip art file from beginning to end.- Use File/Import command, browse to the CD-ROM drive in your PC or MAC and find the file you want to use. Or browse to wherever the file is stored.
- Select the file, and click Open or Import to bring the image into your workspace.
- Place the file on your desktop and click a particular section of the image. If you can select it and drag it away from the rest of the image, the file is not grouped or compounded. You should be able to edit it as you like.
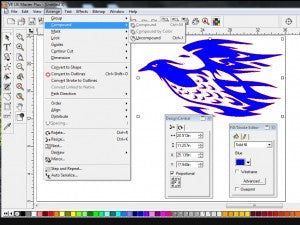
- If clicking anywhere on the file selects the entire image, the artwork is compounded. Position you mouse over the image and right-click. You should see a pop up menu with “Uncompound” at the bottom. Click Uncompound to break the image into its individual paths (depending on how the file was designed, you may see “Ungroup All” instead of Uncompound. The effect will be the same).
- Alternately, you can also simply select the entire image and, from the upper tool bar, select Arrange. Then from the drop down menu, choose Compound. Then from the fly out menu, select Uncompound to achieve the same effect.
- When you ungroup the file, you lose the benefit of the layers so your artwork may now look like a silhouette. Don’t panic, you haven’t deleted anything. To see the individual paths you want to edit, switch to a wireframe view and continue. To do this in FlexiSign or LXi, go to the top tool bar and click View. From the drop down menu, click the Show Fills option. This will toggle fills on or off. When they’re off, you’ll see the paths clearly so you edit them to your liking.
Tech Support Knowledge Base Tutorials
For those of you who need more visual or specific direction, there’s a more complete guide readily available in the SignWarehouse Tech Support Blog. If you have yet to visit our Technical Support Blog you’re missing out on one of the industry’s best repositories of sign making know-how. It’s chock full of tutorials and help documents gleaned from over 30 years of experience in plotting, printing, engraving and garment decoration.
In the LXi section, you’ll find several tutorials on using clip art files. For a step by step interactive video tutorial, follow this link. Don’t be put off by the different GUI (Graphic User Interface) or appearance in the tutorial. It’s based on a legacy version of LXi, but the workflow demonstrated will still enlighten you.
Now you know a little more about basic use of vector clip art and are more prepared to get the maximum efficiency boost from your clip art collections. The next time you find yourself struggling to get to the path you need to edit, slap your forehead and say, "Confound it, it's compounded!" Or maybe not.


