- Open file that you want to trace. Notice that Design Central displays a bitmap tab. This indicates that the open file will require tracing.

- Choose the auto trace tool from the tool bar. This tool is in the shape of a "Z."

- Adjust the settings in the auto trace tab of DesignCentral. Remember that setting everything to the highest and the best will not always give you the best results. So you will need to try them several ways to make sure you get the best trace.

- Using the auto trace tool, click and hold the left mouse button and draw a selection box around the image that you want to trace
.
- Release the left mouse button and it will auto trace the bitmap for you. Notice that the Red line around the boat is the Tracing line. Now you will need to click the arrow selection tool to the left and it will automatically select the trace.

- Using the arrow buttons on the keyboard move the trace off of the original. The trace (shown in red) can now be cut. You should now delete the original bitmap.

- Now you are ready to clean up the path to get rid of all of the jagged lines
.
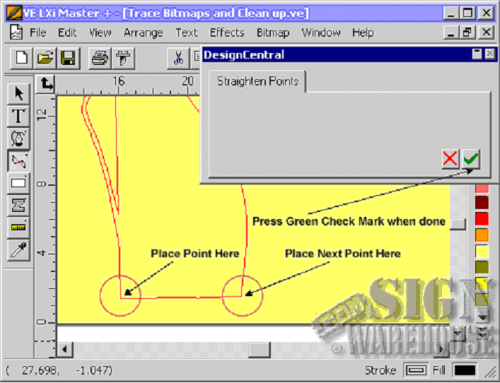
- From the tool bar on the left of the screen, choose the node edit tool. At this time you will see the node points on your traced image. Now choose the straighten points tool from the tool bar.


- Next you will choose the points where you will want straight cuts. You will then press the green check mark when you are finished marking your points. If you want more straight cuts in your trace just repeat step #9
.
- Notice that your line is now straight. Choose the picker tool from the tool bar. This will launch the DesignCentral box and you will be able to make final adjustments before cutting your image.

VE LXi Expert, Master, and Master Plus (as well as all versions of Flexi) allow users to easily manipulate and cut vector images. However, users often want to cut raster images which are not cuttable in nature. That is where auto-tracing comes in handy. Auto-tracing is used to copy/convert a printable image into an outlined, cuttable object, assuring you are making images cuttable
further reading...
View allAs seen in this article
Shop BY categories
Everything you need for sign making, all in one place!


