
Sometimes a job can hit a bump in the road over the tiniest little detail. It can take overlooking one setting and the job will not properly send to the Rogue. One issue our customers are running into is their Rogue Vinyl Cutter is not cutting their contour cut job.
Here are a few steps to check out and hopefully fixed the issue.

It all goes back to when you initially setup your Rogue. When installing the Rogue’s driver, there will be a dialog box that asks where you would like to install the driver’s communication port. The correct procedure will to leave the dialog box to the default selection and click install. Once the program installs the driver correctly, you will have a box pop up and say Install Success. The confusion is when attempting to navigate the ‘Add Setup’ dialog screen in Production Manager.
After selecting ‘Vinyl Express’ as the brand, you will pick 'Rogue', 'Rogue Plus', or 'Rogue Pro', depending on the model that you have purchased. If you are not sure which model you purchased, there is a sticker on the left backside of the cutter. It will have a check box next to your model type. After you pick the model, you will have a dialog box asking to choose the communication port for the Rogue. The correct choice will be 'USB_Printer_0. This option will only appear if the cutter is plugged into your PC via USB, turned on and the Rogue’s driver is correctly installed.
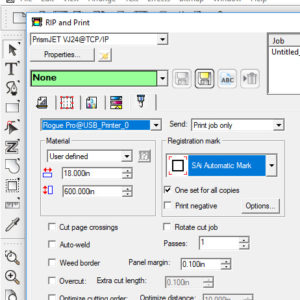
When you go to print and cut your project, check the last tab. This tab has the registration marks and other options for the cut job. Check the drop down menu for model type@USB_Printer_0. In this image, the model we are using is the Pro, so our menu says Rogue Pro@USB_Printer_0. This is the correct selection to send the contour cut job to the cutter. If not on the correct cutter, it will not send the job. It’s a small detail that can be overlooked.
Another thing to keep in mind, if you have another USB peripheral. This includes like a desktop printer or other devices, connected to your PC, you may see USB_Printer_1, _2, etc. In this case, you may need to find the correct entry by trial-and-error. If a test job is not successful, try the next entry and send the job again. Once the correct entry is found, make a note and that will need to be the option you will need.


